

Monday, December 31, 2012
Tuesday, December 25, 2012

Friday, December 21, 2012
Happy Winter Solstice
 |
| theportuguesewaterblog.blogspot.com |
Today marks the day many ancient peoples all around the world celebrated the Winter Solstice. Although it marks the
beginning of winter, Spring is just around the corner.
There may be plenty of bad weather between now and spring flowers, but
today is the shortest day of the year, so starting tomorrow the days
will begin getting longer.
The Winter Solstice marks the turn from the shortest day of the year
towards the return of light and in many cultures this return of
illumination is celebrated, welcomed and revered.
The solstice itself may have been a special moment of the annual cycle of the year even during neolithic
times. Astronomical events, which during ancient times controlled the
mating of animals, sowing of crops and metering of winter reserves
between harvests, show how various cultural mythologies and traditions
have arisen. This is attested by physical remains in the layouts of late
Neolithic and Bronze Age archaeological sites such as Stonehenge (pictured above) in Britain and Newgrange (pictured below)
in Ireland. The primary axes of both of these monuments seem to have
been carefully aligned on a sight-line pointing to the winter solstice
sunrise (Newgrange) and the winter solstice sunset (Stonehenge).
Significant in respect of Stonehenge is the fact that the Great Trilithon was erected outwards from the center of the monument, i.e., its smooth flat face was turned towards the midwinter Sun.

For Pagans, Solstice is symbolically the night when
the Sun Child is reborn out of the womb of Mother Night. For the Mayans,
this year marks the end of a 30,000-year calendar cycle. For pop
culture, somehow this has become the end of the world.
Deep inside we sense that we are, indeed, approaching some kind of end. Maybe it's the end of our current way of life, fueled by cheap oil and the illusion that we can endlessly and thoughtlessly exploit the living systems of the earth without dreadful consequences
We desperately need to make an end of our destructive practices, lest we leave our children a world that is at best impoverished and at worst, uninhabitable. And yet we often seem paralyzed, knowing what we need to do and unable to marshal the will to do so.
May this Solstice mark an end to the era when we saw the world as a
bunch of dead, separate stuff and ourselves as isolated, and the
beginning of a new day when we understand the world as an interconnected web of
relationships." by Starhawk founder of reclaiming.org
My winter wish to all as the days begin to grow longer is for convivial companionship, sweet dreams, and peace on earth. It will be spring before we know it.
Wednesday, November 21, 2012
Happy Thanksgiving

There was no milk, cheese, bread, butter or pumpkin pie at the original Thanksgiving Day feast. However, a menu that included turkey started a tradition that continues in America today...
- Americans feast on 535 million pounds of turkey on Thanksgiving.
- According the U.S. Department of Agriculture, more than 45 million turkeys are cooked and eaten in the United States at Thanksgiving.
- The average person consumes 4,500 calories on Thanksgiving Day.
- Domesticated turkeys cannot fly, however wild turkeys can fly up to 55 miles per hour over short distances.
- Only male (‘tom’) turkeys gobble. Females make a clicking noise. The famous gobble is actually a seasonal mating call.
- The heaviest turkey ever raised weighed in at 86 pounds – about the size of a German Shepherd!
- A turkey under 16 weeks of age is called a ‘fryer’. A five to seven month old turkey is called a ‘roaster’.
- The Turkey Trot, a ballroom dance in the 1900s, was named for the short, jerky steps of the turkey. It became popular mainly because it was denounced by the Vatican as “suggestive.”
- Turkeys can drown if they look up when it’s raining!
- A spooked turkey can run at speeds up to 20 miles per hour. They can also burst into flight approaching speeds between 50-55 mph in a matter of seconds.
- A wild turkey has excellent vision and hearing. Their field of vision is about 270 degrees… one of the main reasons they continue to elude some hunters.
- Turkeys spend the night in trees. They fly to their roosts around sunset.
- Turkeys fly to the ground at first light and feed until mid-morning. Feeding resumes in mid-afternoon.
- Gobbling starts before sunrise and can continue through most of the morning.
- Turkeys are able to adapt to a wide variety of habitats. However, most turkeys are found in hardwood forests with grassy areas.
- The ‘wishbone’ of the turkey is used in a good luck ritual on Thanksgiving Day.
- Californians are the largest consumers of turkey in the United States.
- Approximately 91% of people eat turkey adding up to the sale of over 280 million turkeys for Thanksgiving celebrations.
One of the strangest things we hear about turkey is that it contains tryptophan, a natural sedative. Tryptophan is an amino acid that helps your body produce serotonin, a calming agent in the brain that plays a key role in sleep. Maybe that is why many folks take a post-dinner nap on Turkey Day? Or could it be that this is just an urban legend?
While it is true that turkey contains tryptophan, it’s a myth that you get sleepy from eating it.
Here’s why tryptophan in turkey doesn’t make you sleepy:
- Tryptophan levels in turkey are minimal – almost unrecognizable.
- Tryptophan only works well on an empty stomach. When you have food in your system, tryptophan has to compete with all the other amino acids in your system, so an even less amount makes it to your brain.
The real reason we get sleepy is simple — We over eat — The average Thanksgiving meal contains 4500 calories, most of which
are carbohydrates. This means our body is working overtime to digest
everything causing that post-meal lethargy. So, enjoy your turkey, give thanks for all your blessings and take a nap...or a walk. Better yet...take a walk and a nap!

Tuesday, October 9, 2012
"Spooky Halloween Tray"
Wanted to share the latest tray Renee made...and just in time for Halloween.
The "Spooky Halloween Tray" is made with Lost & Found
paper featuring a skeleton head, spider web, potion bottles and an
extra skeleton body -eekkk! Extra Creepy!

The glitter was already on the
paper, but additional embellishments include (from top right corner
going clockwise): Miniature potion bottles and witch's brew (sealed)
are on the shelf up against potions and brew printed on the paper. A
piece or ribbon resembling a web is in the right corner featuring an
8-legged friend!

Spiders galore on the next window with a stamp of a web
in the left window and spider in his home. A stamp of a more friendly
spider -next to the real looking one on the paper -the calendar month
viewing October featuring "All Hallow's Eve" in orange right next to
the holiday's signature black cat. Wow, extraordinary detail!

The third, and
bottom right opening, portrays the stamp "Quoth the Raven Nevermore..."
Stamp and stickers saying 'forbidden, scary night and boo' with another
creepy crawler.

Next, the focal point of the entire frame (located bottom left) is the skeleton head and cross bones where the stamp
'BOO' is placed. Additional sticker embellishments saying various
things including, 'turn back.'

Next opening wishes you a 'Happy
Halloween' and is stamped with a more whimsical spider and finally
stamped with the important date of 'October 31st!'

Lastly the top left
window of the tray is embellished skeleton keys and a sticker proclaiming, 'you put a
spell on me' symbolizing the fun of the holiday altogether.
The
outline of the tray has borders with skeleton heads, spiders and spider
webs, black cats, and buttons and sequins galore! All topped off with a
witch tag that simply says, 'fright.'

Decorative handle is tied with raffia
for a fall affect. Back of tray is flat with a bracket for
hanging. Priced at $20.00 - this festive Halloween decor is a steal compared to
trays with less detail.
Available at www.yoursmineandhers.com
Thursday, October 4, 2012
Halloween Treat Bags

Aren't these Halloween gift bags just so cute. Beautifully embroidered felt bags with contrasting cotton backs/linings and ties or handles.

These two "cute-as-can-be" bags are made from screen material
and embellished with appliques, ribbons and lace.
Perfect to hold cookies or treats for your special someone.
See more at www.yoursmineandhers.com
Friday, September 28, 2012
Eyelet flowers
I had some eyelet trim (about 40") that had been salvaged from a previous up-cycle project. It was in good shape and cute as can be with the bows and scalloped edges.
It really needed to be used for something.

Took it to the serger for a nice clean edge.

Love my serger - really makes for a professional and durable finish.

Used my ruffling attachment.

Set for maximum ruffle.

What a contraption!
Pretty neat with 4 different adjustments in the amount of ruffle you can achieve.
I found several online for less than $20.
If you like projects with ruffles, it's worth the investment.
Pretty neat with 4 different adjustments in the amount of ruffle you can achieve.
I found several online for less than $20.
If you like projects with ruffles, it's worth the investment.
Of course the old standard method of pulling the bobbin thread works also.
Especially for small projects like these eyelet flowers.
That's the way I learned to do it, and the method I utilized for years
(until Mom brought me the ruffling attachment ). Thanks Mom!
Especially for small projects like these eyelet flowers.
That's the way I learned to do it, and the method I utilized for years
(until Mom brought me the ruffling attachment ). Thanks Mom!

That 40" piece ended up 12" long in less than a minute.
I cut it in quarters so I had 4 - 3" pieces of eyelet.

Sewed up the edges where I cut it apart.

Ran that seam thru the serger so they won't ravel.

Very easy and so cute. Just an embellishment for the center and...

...ready for a tote bag or some other fun project.

The white is pretty, but a bit springy, for this time of year.
Maybe I'll try some tea dye for a more natural fall look.
Saturday, September 22, 2012
More Building Art
In the heart of Downtown Tulsa’s Blue Dome District for the 15th Annual Art of BBQ festival and came across this old building with some neat art. Don't know anything about it, been there for years. Appreciate the sentiment.
.JPG) |
| NE corner of 3rd Street and Frankfort Ave., Downtown Tulsa Oklahoma |
Tuesday, September 18, 2012
Handy Little Pockets
A re-post from mom's blog - she is just sew creative - find her original post here.
This is such an easy
project for a child or a beginning sewer. I have been doing these for years and
have used them in the bedroom, bathroom, nursery and especially in my sewing
room. They make a wonderful gift and can be personalized very easily with appliqué
or embroidery.

Just find a good sturdy hanger and start with a piece of fabric
wide enough to cover the hanger width and long enough to make the rows of
pockets you want. My finished pocket is always dictated by how much fabric I
have. I have one that is only one row deep that I hang off the arm of my
recliner for my cell phone and TV remote. For the one in the picture above I
used a firm woven upholstery fabric left over from a remnant I used for a tote
bag a few years ago.(I am trying to reduce my stash! Really!)
This set of
pockets is for light weight things so I did not even line it at all. I bound
the edges with my quilt binder that attaches to my machine. You could just hem
the edges as well. After I placed the folds for the pocket rows I just turned
the bottom under and sewed the rows in place down the edges and across the
pockets before finishing the edges.
Old Family Photo - Just for Fun!
Best picture ever...hmmm...okay not the most flattering picture, but still one of my favorites.
This photo of my family was taken around thirty years ago. That precious baby, who looks like she is thinking, "What are these fools laughing at?", is all grown up with two precious boys of her own now. That's my mom on the back row (left) with my brother in the middle and my sister-in-law (with baby girl), me (bottom left) and my little sister (bottom right).
Pictures like this bring back such fond memories. Just a regular "dinner at mom's" day when I thought I would try out the timer/delay feature on my 35mm camera (remember those?). I set the timer and then tripped and almost fell on my face as I dove for my spot.
Sure made for a good family photo!
Of course, this was back in the day when the film had to go to the photo lab to be developed. It was about a week later before we saw this great photo. It is just amazing to me that technology has taken us to the present where I can shoot a photo with my digital camera and not only see it in a matter of minutes, but can also share it immediately, via the web!
Who knows what else technology has in store for us?
The possibilities are just endless.

Tuesday, September 11, 2012
An Old Twist on Burlap Flowers
Burlap and fabric flowers are very popular right now. Nothing new here, as with so many other things, it seems a resurgence of popularity is rolling around, again. Wanted to share this great tutorial for a unique burlap fringe flower that made it's debut in the 1960's. Still just as unique and pretty as ever. For the original tutorial go to http://www.cool2craft.com/burlap-fringed-flower-by-tiffany-windsor/ for Tiffany Windsor's great post.

Materials
Aleene’s Original Tacky Glue
Burlap
Scissors
Cardboard squeegee
18 gauge stem wire – green
Large button with shank
Florist tape – green

For full-size flower, cut a piece of burlap 6"x18". For small flower or bud, cut burlap to 6"x5". Apply Aleene's® Original Tacky Glue™ along both long edges of burlap.

Use a cardboard squeegee (or your fingers) to spread the glue smoothly along the edges. Let dry completely until glue is clear.

Starting in the center, pull out one long burlap thread. Continue pulling out threads one by one.
 When all the center threads are pulled out up to the glue line, your burlap piece should look like this.
 Apply Aleene’s® Original Tacky Glue along one edge.
 Spread glue smooth with fingers (or squeegee).
 Fold in half to match glued edges. Press edges together until glue holds and set aside for next step.
 To prepare flower center, fold wire approximately 2″ from end and loop into button shank.
 Wrap florist wire around wire and cover entire stem.
 Apply Aleene’s® Original Tacky Glue along straight edge of burlap.
 Press edge of burlap onto stem just below button and begin to roll wire.
 Roll burlap around and around wire keeping loops from catching in glue
and keeping edge of burlap straight. Be sure to wrap tightly!
Roll burlap around and around wire keeping loops from catching in glue
and keeping edge of burlap straight. Be sure to wrap tightly!
 Slightly lift button center and apply Aleene’s® Original Tacky Glue to bottom of button.
 Pull snugly into center of flower and arrange burlap fringe. Let glue
dry completely.When creating a burlap flower bud, loop the wire but do
not use a button for the center.Assemble the flower following the same
steps outlined.
Pull snugly into center of flower and arrange burlap fringe. Let glue
dry completely.When creating a burlap flower bud, loop the wire but do
not use a button for the center.Assemble the flower following the same
steps outlined.
There you have it...easy as can be and cute as ever!
Thanks for the reminder, Tiffany!
Again, here's a link to Tiffany's original post:
http://www.cool2craft.com/burlap-fringed-flower-by-tiffany-windsor/


Aleene's Burlap Fringe Flower
Aleene’s Original Tacky Glue
Burlap
Scissors
Cardboard squeegee
18 gauge stem wire – green
Large button with shank
Florist tape – green
For full-size flower, cut a piece of burlap 6"x18". For small flower or bud, cut burlap to 6"x5". Apply Aleene's® Original Tacky Glue™ along both long edges of burlap.
Use a cardboard squeegee (or your fingers) to spread the glue smoothly along the edges. Let dry completely until glue is clear.
There you have it...easy as can be and cute as ever!
Thanks for the reminder, Tiffany!
Again, here's a link to Tiffany's original post:
http://www.cool2craft.com/burlap-fringed-flower-by-tiffany-windsor/
Thursday, August 30, 2012
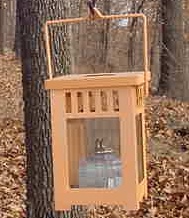
Fish Basket/Candle Finally Made It Home
It has been a busy summer around our place, so we have not made it down to the cabin much. I was delighted to finally make it down this past weekend. I love our little place in the woods near the lake. It is so peaceful and relaxing. I was most excited, this trip, to take the fish basket/candle where I thought it would fit in just right.


 I found an old aqua Mason jar that worked just right to hold a tea-light. It's taller than what I thought I would like, but it was a little windy and the taller jar kept my candle burning until it was exhausted. It really adds to the atmosphere and looks so cool after dark. I added three colorful fishing lures and am on the lookout for more. I like it with just the three, but it's big enough that it could take a few more, just for the daylight sparkle. I have actually found two more of these collapsible fish baskets, am collecting river rocks and looking for more lures to finish them off.
 Wednesday, August 8, 2012
Faded to Fresh
I picked-up this little metal and glass lantern at an estate sale the other day for a quarter.
The glass is all in tact and the metal looks good, except for the color, of course, but no rust.
Originally it looks to have been a tangerine or orange sherbert color...maybe.
Now it's just a faded, dirty peach color...yuck!
My hubby said, "Throw that piece of junk away".
My reply, "I don't think so".
I think there could be a few more outdoor gatherings in the future
of this seemingly used-up little lantern....
I thought it would be a
bit tricky to get the glass pieces out. Not only were they held in with
metal tabs, but also double-sided sticky foam. I just sat it out in the
Oklahoma sun for a couple of hours and the once hard, foam tape was soft and
pliable and easily detached from the metal frame.

The next step was a good cleaning in preparation for a fresh coat of paint (or two). I just filled the kitchen sink with warm soapy water and went to work with my "project" toothbrush (great size for getting into little nooks and crannies). The little lantern then went back into the sun for a couple hours of drying time and was soon ready for this lovely "Blue Ocean Breeze" color.
I was very pleased with how the little lantern turned out...
I think it's good for another season or two.

I take all my plastic, paper, cans, glass and cardboard, etc.. to the recycle center.
However, this is my favorite kind of recycling!
What do you think?
Subscribe to:
Posts (Atom)